Tuesday, December 29, 2009
Things I hate about Mac user interface
No "Print Screen" key
In Windows you can press PrintScreen key in the keyboard to capture the whole screen ot Alt+PrintScreen to capture the current window. In Mac keyboard there's not such key and you have to do it using a built-in screenshot utility.
Cut-and-Paste missing in Finder
Windows Explorer equivalent in Mac is Finder. It does not have cut-and-paste functionality for file manipulation. Only thing you can do is copy-and-paste. So Cut is missing from right-click context menu and keyboard shortcuts. (Cut-and-paste IS available for clipboard operations)
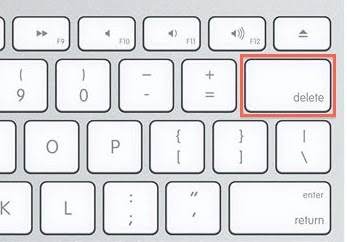
No separate keys for Delete and Backspace
Mac keyboard has only one key for both delete and backspace functionality. You'll initially be confused by it's behaviour. The key is labeled "delete" and placed where the backspace key is on Windows keyboard. Although the key is labeled "delete", by default it has the backspace functionality. To get the the "Delete" functionality you have to use Fn+Delete.
Finder does not support the delete key for deleting files either. You have to right click and say "Move to Trash" or drag the file into Trash. No Shift+Delete is present either :-(
No option to show Hidden files
Finder doesn't provide any option to show/hide hidden system files. If you want to view hidden files you have to manually edit a configuration file using a command line utility and restart Finder process.
defaults write com.apple.finder AppleShowAllFiles TRUE
killall Finder
To stop showing hidden files again, use the same commands with the value FALSE instead of TRUE.
"Maximize" button behaviour
Maximize button in applications have different behaviour depending on the application. This is pretty confusing. The expected behaviour is fill the screen with the current window. But some applications doesn't follow this rule. Most of them just resize the window a little bit more instead of fully resizing. Safari, MS Word and Finder does this.
iTunes will go into the compact mode when you press the Maximize button, contradicting with the '+' sign representing the icon!
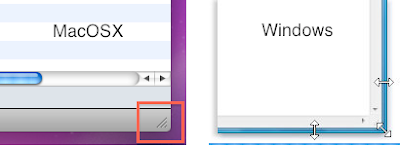
Window edges cannot be used to resize windows.
In Windows, you can use any of the four edges of a window to resize it. But in Mac, you always have to use the lower right corner of a window to resize it.
I think that should be enough for now. There maybe some more things to complain about, but I don't remember them now. Regardless of these shortcomings there are so many things to love about MacOSX! and what's my favourite operating system?? Windows 7! without a doubt!
Tuesday, December 15, 2009
Connecting a Mac to an Active Directory domain
- In the Mac, go to System Preferences -> Accounts
- Click the lock icon to unlock it and enter the admin password to gain access to administrative settings.
- Click "Login Options"
- Under "Network Account Server", click "Join"
- In the popup, click "Open Directory Utility" and make sure all the tick marks are checked.
- In the "Server" field, enter the server name (without "\\" or anything) which is hosting the active directory service.
- If it finds the server, it will ask you for the information shown below:
- Make sure to use the client computer ID that your administrator has given.
- Enter the correct details for the settings and click OK.
Sunday, November 15, 2009
Diving into the iPhone AppStore - Part 2
This is the continuation from the post Diving into the iPhone AppStore - Part 1.
Application <-> Firmware Compatibility
Apple frequently releases firmware update for the iPhone. These new releases includes bug fixes, new features for users as well as developers. If your application depends on a certain feature that is only available in newer firmware versions, it will not work on devices with older firmware installed. For example, the MapKit library which provides native Google Map controls for third-party developers, was introduced in iPhone OS 3.0. So if your application needs to use native Google Map controls, it can only be run on devices with iPhone OS 3.0 or later. Similarly each new version of firmware (3.1, 3.1.2, …) introduces new features like this.
In XCode, you can set the target firmware version when developing your application. You can go as back to iPhone OS 2.0 as well. The best thing to do is setting the target to the minimum firmware version that your application requires so your application will be available to a larger audience. Although most iPhone users upgrade the iPhone firmware as Apple releases them, some don’t.
AppStore
AppStore is the first successful and the largest mobile application store on the planet and it has set a huge distance between it and its nearest competitor, Android Market. In a nutshell, it’s the one big store that iPhone users can shop for third party applications, currently featuring over 100,000 applications. If you are not an iPhone user, just install iTunes on your computer and visit the AppStore. You’re in for a treat!
If Apple is good at something, it’s maintaining the highest quality possible in their products. Their main strength is providing a very high amount of customer satisfaction by means of quality user experience. This is true for the AppStore shopping experience too. Users can easily install applications on their iPhones without any of the technical difficulties that were available on past mobile platforms. The end result is very high user recognition and discoverability for applications developed third party developers. When you put your application on the AppStore, it’s instantly available to all the 30 million something iPhone users around the world. And it’s guaranteed, that it’ll work on all the devices of the users who choose to install it. This is the fact that is attracting developers into the iPhone platform.
Application Approval Process
Apple loves maintaining quality and they want the third party developers to do that too. They don’t want third party developers to cripple Apple’s image in quality. When a user installs an Application, and if it gives crippled user experience, it’s the iPhone that get’s the blame from the user. Obviously Apple doesn’t like it and they want the user to have the best experience possible with their device. So they have a set of rules that every third party developer should follow in order to ensure that quality.
Making a release
When you finish building your application, and finish your internal testing and QA, you’d think you could make your application available to users straight away. This is not the case with iPhone. When your application is ready, you have to submit it to the Application Approval Process.
This is where things get interesting. It might take weeks (or months!) to get your app approved (or rejected!). You have no control whatsoever over this process and you have to wait until you get results from Apple. If your app is approved, it’ll appear on the AppStore and you’ll be notified. Since it’s humans that inspects your applications you can expect human errors and inconsistencies in different situations. According to Apple, they have a team of 40 full time employees, who have to review nearly 8500 application submissions per week. And every app is reviewed by 2 employees. Funny ha!
The point is, things can go wrong! and you won’t have any control over it. Suppose you submit your app and after few weeks it gets approved. As the users start using it, you notice a small bug that can be fixed quickly. But still, you have to resubmit the modified version of application and wait…all over again just to ship that small bug fix, while users keep using the buggy version. Because of this, you have to be very very careful in making a release into the AppStore. A small mistake can cost you so much.
Economics
Despite all the drawbacks, AppStore has a constant developer attraction. Mainly because of the unification that it provides in terms of distributing their software. After your app appears on the store, users around the world can buy it with a single click, using their computers or iPhones. (and it’s guaranteed to work on their devices) With every sale, the developer gets 70% of the price of the application and 30% goes to Apple. It’s that simple. No more infrastructure maintenance, financial handling and complex charging policies. You’ll get a monthly cheque from Apple. You don’t have to pay anything if your app is free.
As the developer, you get to choose the price of your app. From the start, developers have experimented with various pricing strategies which have yielded very interesting results. The sweet spot is considered $0.99. The net profit you get doesn’t come from the profit margin. It’s the sheer number of sales you could get if you do things right. There are lot of success stories about developers who have made fortunes with their simple, $0.99 apps. In the AppStore, sales figures can come in tens of thousands per day. So even if you make $0.50 profit per sale, it can mean $5000 profit per day! With the sheer number of iPhone users around the world (more than 30million) you have can have a huge target user base who can use your application. It doesn’t magically give successful results. You have to be creative and strategic with you application.
Conclusion
With all that being said, there’s a LOT I haven’t said. The web is pouring with iPhone and AppStore related articles in which many are interesting reads. I’ve been following on all the things related to iPhone even before it’s release. If you follow up on the subject, it may turn out to be fascinating to you too. As with everything in this universe, it has both good and bad things about it. Just know your beast and learn to get the most out of it. If you need to know more info, just search the web or put a comment.
Good Luck!
Interesting reads:
Thursday, October 29, 2009
Diving into the iPhone AppStore - Part 1
Tuesday, September 15, 2009
Gaming Industry and "XP Effect"!
Friday, July 24, 2009
Windows 7
Saturday, July 4, 2009
My 3 Column Blogger Template
If somebody liked my template and wanted to modify, you can download it from the link below. Remember, this is just a modified version of Blogger Son of Moto template.
Download Link: http://www.mediafire.com/?ytdywrnq4zn
All images are tiled .gif ones. and they add up to just 1KB. I cannot guarantee the availability of images in its current server. So I suggest you host the images on your own server if you really need to use those.
.
Sunday, June 21, 2009
How to unlock iPhone with OS 3.0
Apple released iPhone OS 3.0. So Dev-Team has released a jailbreak tool for OS 3.0. This lists down the steps for upgrading your iPhone to OS 3.0 and then jailbreaking it. FYI, Jailbreaking and Unlocking are two separate things. You have to Jailbreak before unlocking. Jailbreaking is cracking the OS. Unlocking is making any SIM work with your iPhone.
The procedure is slightly different for iPhone 2G and iPhone3G. So do whatever applies to you. The process is fairly easy and doesn't use any command line tools..
I personally did this procedure only on my iPhone 2G. I have no way of testing this for iPhone 3G.
Upgrading the iPhone
- Open iTunes. (version 8.2 or later must be installed. Get it here)
- Connect your iPhone to the computer. iTunes will show the iPhone sync screen.
- Click the Update button in iTunes.
- iTunes will begin downloading the firmware file (about 240MB).
- The download progress will appear in the "Downloads" section of iTunes left panel.
- You can disconnect your iPhone while the file is being downloaded. Connect it after the download and click Update button again.
- iTunes will install the downloaded firmware file to your device. This may take like 20 minutes or so.
Preserve the downloaded firmware file
- Now you have to locate the firmware file iTunes just downloaded and store it in an easy to access folder.
- In My Computer, go to this address: %AppData%\Apple Computer\iTunes\iPhone Software Updates
- This folder is where iTunes stores downloaded iPhone firmware files. You have to copy the file corresponding to your iPhone to any folder you like for future use.
- for iPhone3G : iPhone1,2_3.0_7A341_Restore.ipsw
- for iPhone 2G : iPhone1,1_3.0_7A341_Restore.ipsw
Jailbreaking Procedure
- Download the latest version of redsn0w torrent from here: http://thepiratebay.org/user/iphonedev/
- Extract the downloaded archive. There will be a program called redsn0w.exe in it.
- Run the redsn0w.exe. This is the jailbreaking tool.
- Carefully read instructions on the screen and do what it says.
- In the first screen, click browse and give the firmware file you copied before.
- In the next screen put a tick for Cydia and click next.
- Follow instructions on redsn0w and if u follow it the phone will be jailbroken within like 15 minutes or so.
If you upgraded an iPhone 2G it should be already unlocked. iPhone 2G does not loose its unlock when upgrading. On the other hand, iPhone 3G looses its unlock when upgraded. So you have to install ultrasn0w to unlock iPhone3G.
- Connect the iPhone3G to the internet (WiFi Only. Cannot use 3G since SIM is locked).
- Open Cydia in iPhone.
- In Cydia, go to Manage -> Sources
- Tap Edit, then tap Add.
- Type this in the text box: repo666.ultrasn0w.com (There's a Zero in the word ultrasn0w)
- Tap Add Source. Wait until it refreshes. If you typed it wrong, it will give an error.
- Go to Search and search for "ultrasn0w" and install it.
- Reboot your iPhone3G.
Incoming phone number detection issue
iPhone does not support Sri Lankan phone number formats (as many other unsupported countries). So if your address book contact has 071123456 and if you receive an SMS from +9471123456 then the SMS will not detect the contact name for that number. You can fix that after jailbreaking by installing a patch from Cydia. You don't have to do this if you don't have the issue.
- Connect your iPhone to internet (through WiFi or 3G).
- Open Cydia. (Cydia is automatically installed when jailbreaking)
- Wait until it refreshes its database.
- Go to search tab from the bottom panel.
- Search for "Caller ID Fix"
- Some results will appear. As at the time of writing the latest version was "Caller ID Fix for 2.2". I installed this on iPhone OS 3.0 and it worked for me.
- If it shows a fix for 3.0 then install that version. Otherwise fix for 2.2 will be OK.
- Tap on the item and install it. It will do some rebooting stuff after installing and your contacts should be identified correctly now.
Put any questions you may have on comments. Good luck!
.
Monday, June 8, 2009
NFS Undercover on iPhone
The game has nearly all the features as the PC version:
- Same stupid story
- Police and traffic
- Nitros and Speedbreaker
- Slow-motion and tilting cameras (gives a really thrilling experience)
- Car customizations (performace and visuals)
- Quality music tracks (EA always does this right)
Here are some screenshots I took (click on the images for bigger versions).
In the garage. You can use typical iPhone finger guesters to zoom and rotate the car. Customizations are available for nearly every feature.
Race tracks are diverse and fairly detailed. You can get a really nice and intuitive driving experience with a fine-tuned accelerometer usage from EA.
Cops are quite good and helps increasing the quality of the game. I still didn't see any heavy SUVs which are my favourites in the PC version!
The game is available on AppStore for $9.99. I also downloaded Assassin's Creed but didn't install it yet. It needs firmware 2.2.1 (I have 2.2) but I'm lazy to upgrade with 3.0 just arround the corner.
.
.
Wednesday, June 3, 2009
The Shut Down Comparison!
I'll compare the shut down mechanisms of the 3 major operating systems we use; Windows XP, Windows Vista and Ubuntu 9.04. Specifically, I'll consider the number of mouse clicks and mouse movement they require from the user. Although there are shortcut keys associated with them, I won't consider them since ordinary users won't know about them anyway.
Windows XP
In XP, users have to go through 2 dialog boxes to accomplish the task. First, the start menu and the second, the final shut down box.
- Click Start button. (click 1)
- Click "Turn Off Computer". (click 2)
- Move the mouse to the center of the screen.
- Click "Turn Off" button. (click 3)
Windows Vista
This is totally confusing for new users. There are number of ways you can shut down. With the default settings, you see a yellow "shut-down-like" button. People mistake this as the shut down button where it actually means "Sleep". To truly shut down the computer, you have to click the small arrow, and choose Shut Down from the not-so-simple menu that appears. This process needs a very high amount of concentration from the user.
This is the way you do it with default settings.
- Click Start button. (click 1)
- Click the small arrow to the right of Sleep and Lock buttons. (click 2)
- Choose "Shut Down" from the the list. (click 3) (This list has 6 items. If you needed to Restart you have to find where restart is in the list. Shut Down is easier since it's the bottom-most item.)
You can change the behavior of the Sleep button to Shut Down via power settings. Read this for instructions on how to change it. Then the whole process changes.
- Click start button. (click 1)
- Click "Shut Down" button. (click 2)
In Vista they have increased the number of ways to shut down and none of them are perfect. XP way is better in my opinion.
Ubuntu 9.04
Ubuntu 9.04 reportedly have a nice and clean interface. This is true for their Shut Down mechanism too. Although they have borrowed the idea from Apple MacOS X, they does a good job integrating it with their user interface.
- Click the power button at the upper-right corner. (click 1)
- Choose Shut Down from the menu. (click 2) (Menu has 6 items. Shut Down is at the bottom and Restart is the one before that)
If you choose, you can continue the previous process further.
- Move the mouse to the Shut Down dialog box.
- Click the shut down button. (click 3)
It's "2 clicks" or "3 clicks with a mouse move" depending on the way you choose. But always the result is the same and you have the confirmation dialog so you can undo your decision. This is the nicest shut down process I've seen so far (including MacOS X).
Finally, see how much we can talk about a simple operation like this. (as if we don't have anything else to do!) These subtle changes effect the user's perception of an operating system. And most of the time, these are the "only" things that a user uses to judge an operating system.
Any thoughts?
.
.
Wednesday, May 27, 2009
Between 2 worlds! Firefox and Chrome
Remarkably, my list of likes and dislikes is not so long. There are only one or two things that I dislike about these products but they have a very big impact in my (I think everyone else's too) browsing habits.
These are the specific things that gets on my nerves. While these may not effect other people, they directly collide with my web usage.
1. Firefox being bad!
- Takes a long time to start.
- Address bar does not support full google search (specially "define:" keyword)
- Separate search box.
- Separate download window. (There are some buggy add-ons to eliminate this)
- "Stop" button is at the right side. It should be moved to the left of the address bar.
- Sometimes Tabs go "not responding" (more frequently than Firefox).
- Some web pages are not rendered correctly.
Then I have the things which makes Chrome better than Firefox.
- Really intelligent all-in-one address bar.
- Simple and clean user interface.
- Efficient use of screen real estate.
- Download handling.
- Starts up quickly.
- Make a Firefox that doesn't have bad features listed in (1).
- Make a Chrome that doesn't have bad features listed in (2).
What's your choice? any thoughts?
.
.
Tuesday, May 19, 2009
Download the same torrent from Windows and Ubuntu
If you are a torrent downloader and a person who needs to switch between Windows and Ubuntu frequently, you need to continuously download your torrents from both operating systems. Most torrent clients facilitates this requirement. I'm going to demonstrate this feature using 2 bittorrent clients named, uTorrent (Windows) and Transmission (Ubuntu). But this can be applied on any modern torrent client.
What actually happens here is each client starts downloading from where the other client left off. Obviously for this, both clients must save the files to the same location on the hard disk.
I'm going to start with Windows assuming you are running uTorrent on it. I assume you don't need much explanation with uTorrent.
Starting the torrent
- Download and save the .torrent file you need.
- Start the download from uTorrent. But when you give the download location, save it to a path where it is accessible from Ubuntu as well. For this example I'll assume it is D:\Downloads.
- Suppose in the middle of the download you decided to go to Ubuntu. Assume you were at 41% of the download.
- If you haven't done so already, install Transmission from the Synaptic Package Manager in Ubuntu. It's pretty easy and straightforward to configure if you are a torrent user.
- You can access Transmission from Applications -> Internet menu.
- Open the same .torrent file you used before. (or you can download it again) It will be opened from Transmission and You'll get the Torrent Options dialog box. (Note the 0% download progress of files)
- For the Destination Folder, give the same location you used before. For example, on Ubuntu it may be something like /media/sda2/Downloads.
- If you have done it correctly, download progress of all files should be automatically updated. If not, you can click the "Verify Local Data" button to update the download progress. (This will take some time for large torrents)
- Click "Add" to start the download. Transmission will continue downloading from where you left off earlier.
- You can also continue the torrent from Windows if you decide to leave Ubuntu and go to Windows.
- Open uTorrent. The old torrent entry must still be there. Stop the torrent if it is running.
- Right click the torrent and click "Force Re-Check" from the menu. uTorrent will update the download progress of the files. (This will take some time for large torrents)
- When it has finished updating you can start the torrent to continue downloading from that point.
- This procedure is the same for Transmission. You can right click the torrent and choose "Verify Local Data".
Enjoy!
.
.
Sunday, May 17, 2009
Solve Ubuntu Network Manager problems
One solution is to remove the Network Manager and edit the network configuration files manually. But there's an easier approach. You can install Wicd to do the configuration for you. This is an alternative to the default network manager which does it job right. It's really simple and straightforward to use.
Here are the simple steps required.
- Install wicd through Synaptic Package Manager.
- Network Manager will be removed from the tray panel when you install wicd.
- Go to System -> Preferences -> Startup Applications and disable the Network Manager.
- If newly installed wicd network icon isn't there in the tray panel, launch it from Applications -> Internet -> Wicd Network Manager. It will start automatically from next startup.
- In the Wicd Manager, expand Wired Network section and click Advanced Settings.
- Enter your IP address details here. The settings will be applied as soon as you click the OK button.
- You can open a terminal and type "ifconfig" to check whether the IP address settings have been correctly applied.
.
iPhone device timeout error when syncing
Note. For this to work, your iPhone/iPodTouch has to be jailbroken.
I found the original solution from here. The solution is to delete /private/var/mobile/Media/iTunes_Control folder from the iPhone and sync with iTunes. This should work for both iPhone and iPodTouch.
Here are the detailed steps to follow.
- Download DiskAid or iPhoneBrowser. On Windows you need .Net Framework 2 for this. (I'm using DiskAid)
- Connect the iPhone to the computer. (close iTunes if it is running)
- Open DiskAid or iPhoneBrowser. It will show you the folder list of the iPhone.
- Navigate to the folder /private/var/mobile/Media and delete the "iTunes_Control" folder in there. (be very careful NOT to delete any other things)
- Close the application and Sync with iTunes.
I don't know the exact reason for this problem. But that person told he changed the USB port that he plugs the data cable. It may have something to do with changing USB ports or the machine you use to sync.
.
.
NFS Undercover
6.5 GB of Hard disk space required.
This is certainly not the crown jewel of the Need for Speed series. But it sure has some unique features (good and bad). The game features a story just like the last few versions. The game has a big open world, police, lot of cars and few unique event types. Time of day is set to the so called Magic hour where you experience a unique yellowish lighting condition.
Among few others, my favorite event was where thugs are chasing our girlfriend to smash her car. We are chasing those thugs to smash their cars and the city police are chasing all of us to take into custody. Cops seems somewhat easier to beat than in previous versions. Overall the game appears very artificial. Driving is not natural at all. Driving physics of NFS Undercover takes out the fun we had in previous versions.
Graphics
I played this game with highest graphics detail and highest resolution. Graphics appear bit artificial. Shadows had to be turned off because they totally sucked! My system specs are here.
Here are some screenshots:
Friday, May 1, 2009
Burnout Paradise The Ultimate Box
3.2 GB of Hard disk space required.
This is one of the best racing games I've ever played. The game has no story though so it gets boring after a few days of playing. The main reason I loved this game was its graphics and gameplay experience. Designers have built realistic collisions, car damage and Matrix style slow-motion camera movement into the game. Its basically like watching a simulation when vehicles collide.
The game takes place in a large city called "Paradise City". There is no police so you are free to roam around and do all the crazy stuff you can do with your car. Performing stunts plays a big role in the game. There are no menus to access races. Every junction in the city is a starting point for a race. One of the hardest parts is finding your way to the finishing line. There's no GPS or any guidance so you have to rely on the map which shows the dense road network of the city.
The cars that exist in the game do not exist in the real world. Game uses an imaginary set of car models with imaginary manufacturers. Nevertheless their car designs are truly superb.
Graphics
I played this game with highest graphics detail and highest resolution and graphics are very much realistic. My system specs are here.
Realistic collisions are shown with dramatic slowmotion camera angles.
Literally every part of the car is breakable. You can actually see tires break and fly away when you hit it hard.
This is what you get if you speed too much!
A moment captured in the middle of a jump.
Variety of vehicles are available. This includes 4x4 trucks, old classics, F1 cars and bikes.
Video uploaded by Thusitha :
The game gets bit repetitive since you get to play the same races again and again (with different cars) to get past levels. But you sure can enjoy freely roaming around the big city and performing stunts to your liking.
.
.
Thursday, April 30, 2009
Crysis:WARHEAD
5.6 GB of Hard disk space required.
This has the most advanced graphics and effects among current fleet of gaming titles. World is full of natural beauties and interactivity. Intense combat takes place in tropical forests and various other landscapes. Game music and sound effects gives the true feeling of intense fighting. Crysis:WARHEAD is the sequel to the original game Crysis. The game storyline is pretty cheap though compared to Assasin's Creed. The character wears the Nano Suit which has a significant role in the story.
Graphics
I was restricted to 1024 X 768 resolution, 2X antialiasing and No Motion Blur with this game. All the other effects could be set to highest detail. Even then the graphics looks astonishing. My system sepcs are here.
Game Music
I loved the in-game music of Crysis:WARHEAD. If you like them, you can find them inside the game installation folder. Go to the "Game" directory inside the installation folder and open the file "Warhead_Music.pak" with WinRAR and extract it. All the audio files of the game are in the archive in ogg format. You can find the long music files by looking at the file size.
World is full of beautiful sceneries like this.
Sea water is just like the real thing.
Lot of objects in the world are interactive. Trees literally break apart where you shoot them.
You also get to drive military vehicles.
Make your way through dense tropical forests.
Your enemies are these aliens and the Korean military.
Here's a video of the game by Thusitha:
The game may be little bit short compared to other games. But it keeps you going right until the end with the music and heavy fighting.
.